
🤦 Intro - The rantings of a muffn #
Here we are again. Politicians making laws about technology they fundamentally don’t understand, wrapped up in the classic “think of the children” rhetoric that’s become the defacto justification for the surveillance state.
The UK’s Online Safety Act has just come into effect, and predictably it’s a complete shitshow on all fronts. Reddit now requires UK users to upload government ID or take selfies just to view anything tagged as ‘NSFW’. Not even actual porn, mind you. Just anything tagged as “mature content”. This has taken the form of blocking posts about protests, self-help, and other topics that should not be age-gates, yet here we are.
They’ve farmed this verification off to an American third-party company, Persona, that uses facial recognition scans. Nothing could possibly go wrong with centralising biometric data of millions of people accessing adult content, right?
But muffn, there’s nothing actually linking your online account/activity to your verification. - If you think/believe this, then this post is not for you.
And it’s not stopping there. Spotify is now requiring age verification for certain content, threatening to permanently delete accounts if users can’t prove they’re old enough. Yep, you read that right, a music streaming service demanding government ID verification or your entire account gets nuked. God forbid little Timmy hears about Khia’s neck, back pussy and crack.
This is what happens when politicians operate on gut reactions and “greater good” rhetoric instead of consulting actual technology experts. Age verification sounds reasonable in theory until you realise it creates a surveillance infrastructure. One that’s ripe for data breaches, government overreach, and systematic privacy violations. But hey, at least we’re doing parents’ jobs for them by protecting the children from seeing a mildly risqué meme.
The UK’s descent into a nanny state isn’t unique. This authoritarian approach to internet regulation is spreading globally. Politicians worldwide are discovering they can justify almost any privacy invasion by claiming it’s “for safety”. Backdoors in encryption, mandatory identity verification, content filtering. It’s all fair game when you simply don’t give a shit.
Fortunately, technology as a whole isn’t beholden to the whims of asshats.
So let’s talk about VPNs. They do many things, and many companies claim they do far more than they actually do. At the fundamental level though, a VPN takes your traffic, throws it in an encrypted tunnel, and pops it out somewhere else.
Whether you’re trying to access content without age verification, watch region restricted content, or maintain basic privacy in an increasingly surveilled digital landscape, this tutorial covers how you can use OPNsense to selectively route your traffic via a VPN.
📝 Prerequisites #
This guide will focus on implementing PBR with WireGuard on an OPNsense firewall. The methodology is based on general networking and firewalling concepts though. The steps outlined in this post would work on other router/firewalls as long as they support the same features. How you would do this on a non OPNsense firewall is beyond the scope of this post.
In particular, pfSense users should be able to implement this guide with minimal changes, but again this is out of scope for this post. Consider switching to OPNsense.
If you’re reading this, I’m going to assume you’re reasonably competent with a computer and have some basic understanding of networking. You know what a VPN is, you know what WireGuard is, and you’re running some form of capable firewall/routing device. Not the POS that your ISP provided.
To follow this guide, you will need:
- An OPNsense firewall reasonably up to date.
- Administrative access to the OPNsense.
- A VPN service that supports WireGuard (recommendation below).
- Basic understanding of networking concepts/able to follow a guide.
☠️ ‘Free’ VPNs #
Never use a ‘free’ VPN. They are not free, they are not secure, and they are not private. They are a way for companies to make money by selling your data. The only exception to this is Proton, which I will discuss below. The free tier does not allow what we need for this guide though.
🤔 What is Policy-Based Routing (PBR)? #
PBR allows a firewall to make routing decisions based on certain criteria. Instead of using traditional routing tables, PBR can route traffic based on:
- Source IP addresses
- Destination IP addresses
- Port numbers
- Protocol types
- Time of day
- Interface used
What criteria you can use depends on the firewall. Enterprise firewalls can route traffic based on very specific criteria, but for what we want to do, OPNsense is just fine.
📖 How this works #
What we want to do is rather simple. We want to selectively route traffic through a VPN based on the domain name.
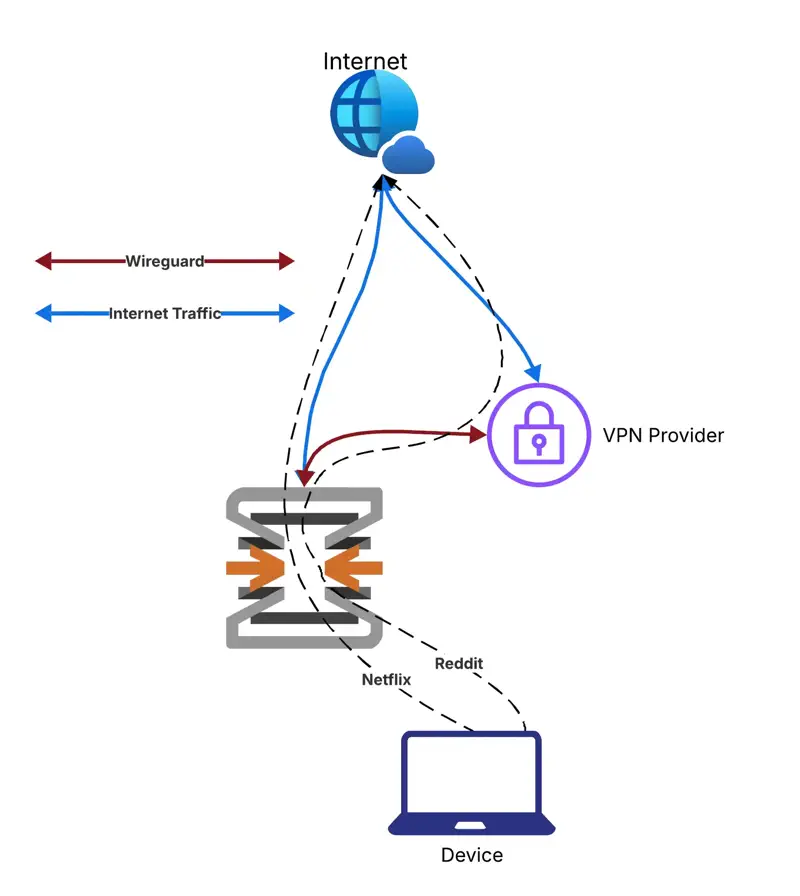
OPNsense will have a connection to our VPN provider via WireGuard. We can send traffic through this connection. The traffic is then processed by the VPN provider and sent to the internet, appearing as if it’s coming from the VPN provider. If this VPN node is not in a country that mandates restrictions, then we don’t get restrictions. Simple.
This is better than running a VPN on your device. Running a VPN on your device is fine too, of course. Good ones even allow split tunneling to specify which apps are tunneled. But when you want to start doing this for your desktop browsing, this becomes a bit more troublesome. You’re now using 2x connections to your provider.
By filtering traffic on the firewall itself, we can capture traffic from any downstream device on the network and route it through the VPN using one connection. This means that anyone on the network will be able to bypass the restrictions, on any device, without having to install and set up a VPN client.
⚡ Performance & Limitations #
There are a few things to consider when tunneling traffic via a VPN:
🔹 Performance Considerations #
Server Location Matters: VPN performance is heavily dependent on the distance between you and the VPN server. Initially I was using a node in Eastern Europe but noticed Reddit images would load very slowly from top to bottom, like I was back on dial-up. I changed to a Western Europe server (much closer to the UK) and now the experience is indistinguishable from non-tunneled traffic.
Choose your VPN server wisely:
- Pick servers geographically close to you for best performance
- Test different servers from your provider to find optimal routing
- Monitor performance over time as server loads change
Adding to this, just because a server is geographically close to you, doesn’t mean it’s the best choice. Some servers are better than others. It really depends on the stack the provider is using, what ISP the node is connected to, what the routing between you and the node is like, and so on.
You can definitely expect to see a slight latency increase to traffic, how much depends on the server you are using, and the provider themsleves. Any provider worth their salt will have a good selection of servers to choose from and have big enough links that you should see no impact to actual bandwidth and perceive no difference in browsing experience.
🔹 What NOT to Tunnel #
Below I will go through ways to use PBR to selectively tunnel traffic, or how to tunnel everything, but before getting into this I want to touch upon things you should probably avoid off the get go:
- Work Traffic: Never tunnel work-related traffic through a VPN without explicit approval. This can possibly land you in hot water as it can violate company security policies, making it appear like you’re working from a different location, and potentially breach compliance requirements.
- Gaming Traffic: Avoid tunneling gaming traffic as there is no benefit to doing so. You are simply increasing latency which will severely impact online play. I have heard of some servers blocking VPN traffic entirely too.
- Banking & Financial Services: I’ve personally not heard of any banks blocking VPN traffic, but it would be a good idea to not tunnel this traffic as it may be flagged as suspicious activity.
- Streaming Services: Netflix, BBC iPlayer, and other streaming services actively block VPN traffic. There are valid reasons to tunnel the traffic, of course, such as accessing content that is region restricted but this seems to have been cracked down on by the streaming services. Proton claims to be able to bypass this but I cannot comment on this as I don’t use streaming services.
🚀 Proton VPN #
Proton VPN is a good choice if you’re in the market for a provider. It’s a Swiss based VPN provider that is not subject to any data retention laws (at the time of writing, this seems to be changing) and has a good reputation for privacy. Proton is also one of the few providers that allow port forwarding, which is great for torrenting. You can read more about this in my guide.

Tunnelling Torrents 'Properly' Over a VPN With Port Forwarding
On top of this, they allow for 10 simultaneous connections. I personally use the entire Proton suite and have been very happy with the company. I did a whole writeup on the Proton suite in my de-googling post.

De-Googling - Email, Storage, Photos & Location Without Google Services
Other options are available but I cannot comment on them. The only other provider I can recommend is Mullvad, but the Proton offering is a lot more generous for cheaper (especially if you use the link below).

Whoever you choose, you will need to get a VPN provider that supports WireGuard, which is most likely all of them now.
🔧 Setting Up Proton VPN #
Once you have a ProtonVPN account, you need to generate a WireGuard configuration file. How you do this on other providers will vary, but what we want is a file that contains the public key of the VPN provider, the private key of the VPN provider, and the endpoint of the VPN provider. This will be in the form of a .conf file.
To create a WireGuard configuration file, login to the ProtonVPN web interface and follow the following steps:
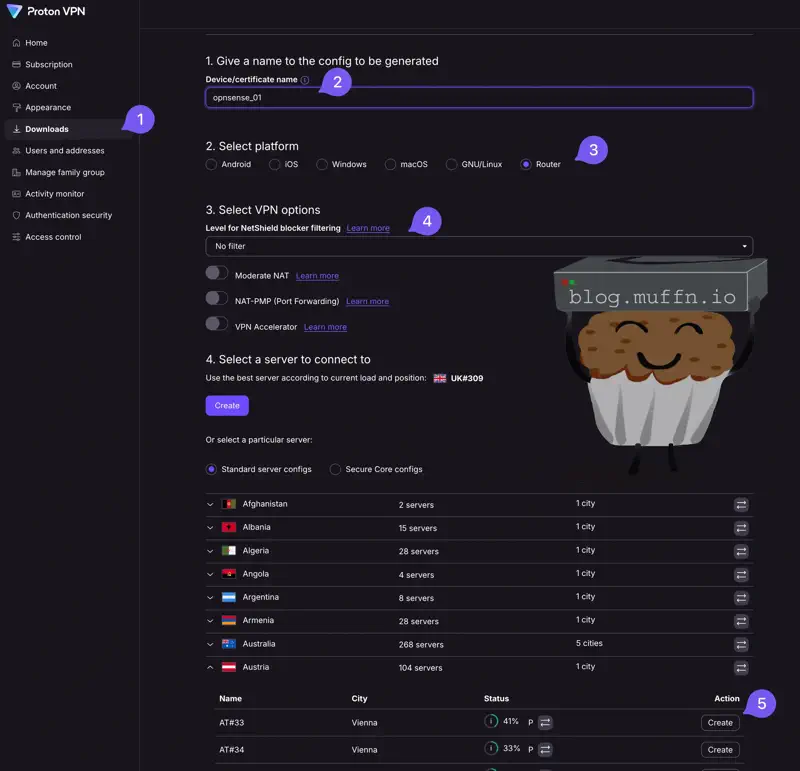
- Click on ‘Downloads’ to get to the UI above.
- Give the configuration a name, this can be anything as it’s simply an identifier.
- For ‘Platform’ select ‘Router’.
- There are several options here which you are free to choose. Personally, I do the following:
- No filter
- Moderate NAT unchecked
- NAT-PMP unchecked
- VPN Accelerator unchecked
- Select a server. The default server selection will choose one close to you, which for me is a UK server and so I selected one in Austria. You can select any server you like that fits your requirements.
Once you select create on your selected server, you will be shown a configuration file. This is always viewable and downloadable so don’t worry about losing it, but it is helpful to copy the configuration shown into a text editor for later use.
For reference, the configuration file will look like this:
[Interface]
# Key for opnsense_01
# Bouncing = 0
# NetShield = 0
# Moderate NAT = off
# NAT-PMP (Port Forwarding) = off
# VPN Accelerator = off
PrivateKey = 8K3mN7qR5vL9xW2eF4pA6sD8gH1jM3nQ5tY7uI9oP0z=
Address = 10.2.0.2/32
DNS = 10.2.0.1

[Peer]
# AT#33
PublicKey = B4aE7fK9mL2pR6sT8vX1cF3gJ5hN7qU9wY2eI4oA6sD=
AllowedIPs = 0.0.0.0/0, ::/0
Endpoint = 91.132.139.2:51820
📡 Connecting OPNSense via Wireguard #
Next we need to set up the WireGuard connection on OPNsense.
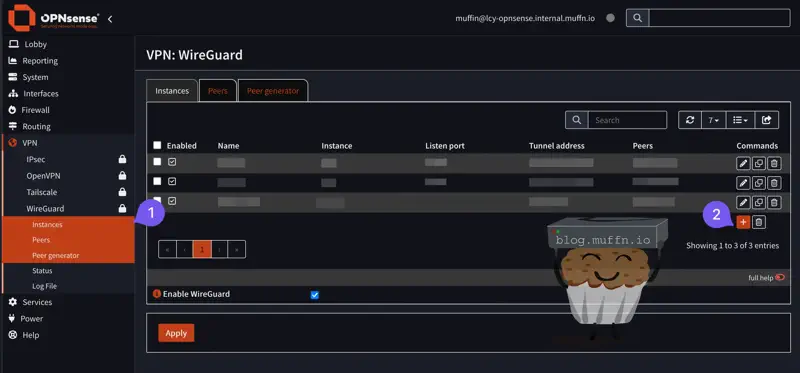
🔹 WireGuard Instance #
- Navigate to VPN > WireGuard > Instances
- Click Add to create a new instance
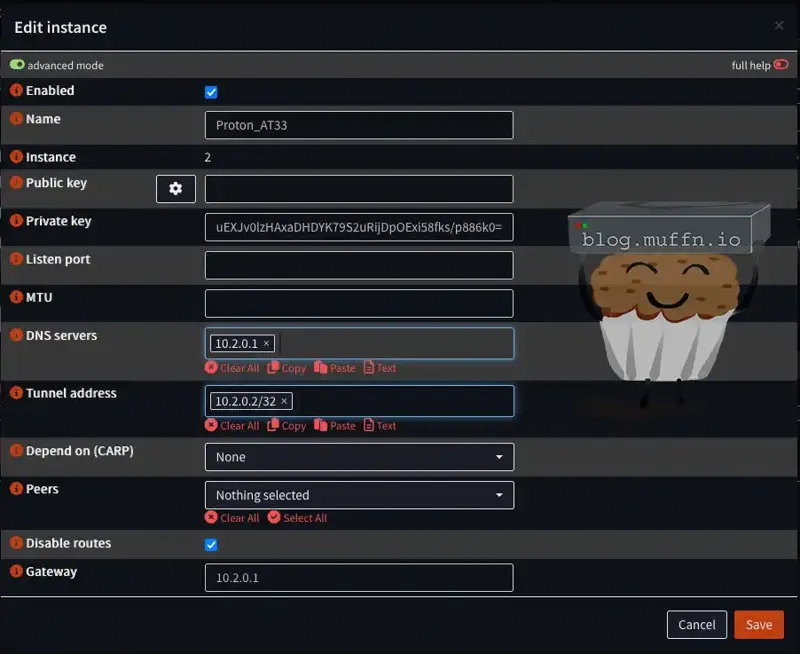
- Configure the local instance:
- Advanced Mode: Check the box
- Name: Descriptive name (e.g., “Proton_AT33”)
- Public Key: Leave blank - this will be generated automatically
- Private Key: Enter the private key from the configuration file
- Listen Port: Leave blank - this will be generated automatically
- MTU:
1420 - DNS: Use
DNSfrom the configuration file - Tunnel Address: Use
Addressfrom the configuration file - Peers: Leave blank
- Disable Routes: Check the box
- Gateway: Enter same address as
DNSfrom the configuration file - Save the configuration
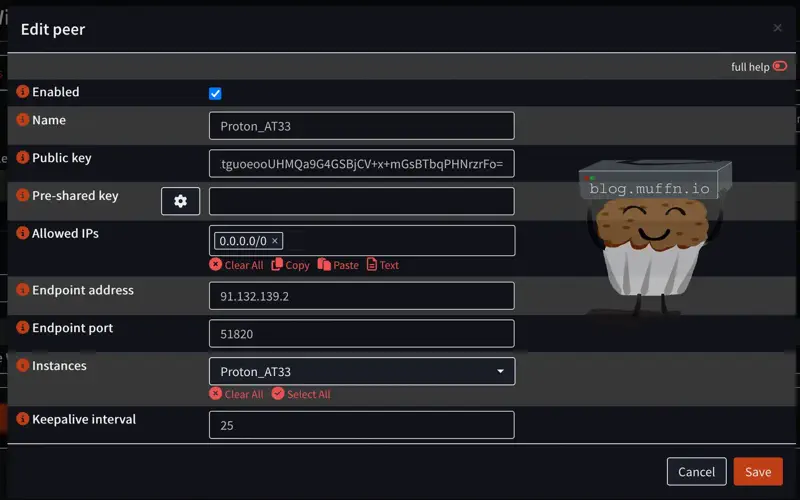
🔹 WireGuard Peer Configuration #
- Go to VPN > WireGuard > Peers
- Click Add to create a new peer
- Configure peer settings:
- Name: Descriptive name (e.g., “Proton_AT33”)
- Public Key: Enter the public key from the configuration file
- Pre-shared Key: If your configuration file has a pre-shared key, enter it here.
- Allowed IPs:
0.0.0.0/0 - Endpoint:
Endpointfrom the configuration file - Endpoint Port: Port from the
Endpointsection of the configuration file (e.g.,51820) - Instances: Select the instance created in the step prior
- Keepalive Interval:
25
- Save and Apply the configuration
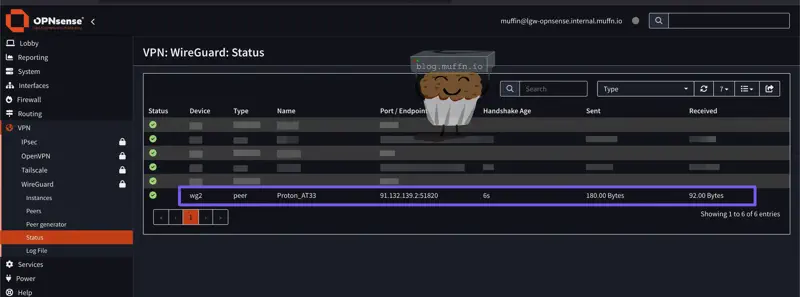
Now if you navigate to VPN > WireGuard > Status you should see your connection listed and connected.
I feel like these instructions are pretty clear and won’t deviate much from provider to provider, but if you have any issues your provider may have their own documentation or support.

🔌 Interface, Gateway & NAT #
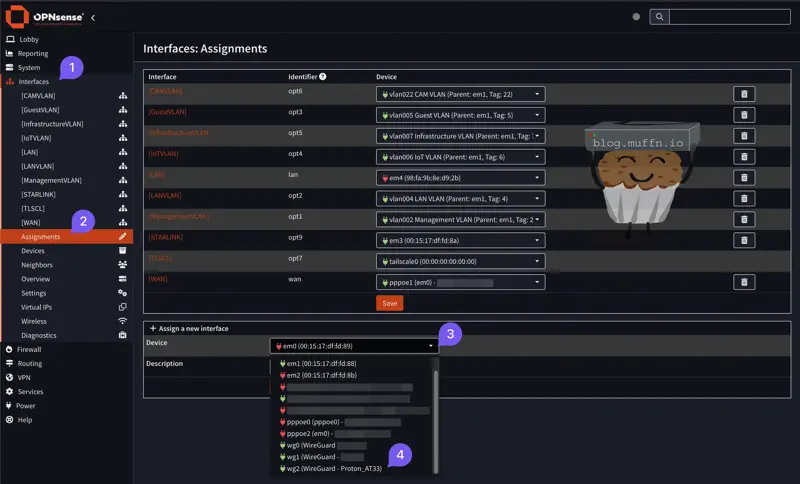
In order to send traffic through to the VPN via Wireguard, we need to assign our Wireguard connection to an interface.
🔹 Interface Assignment #
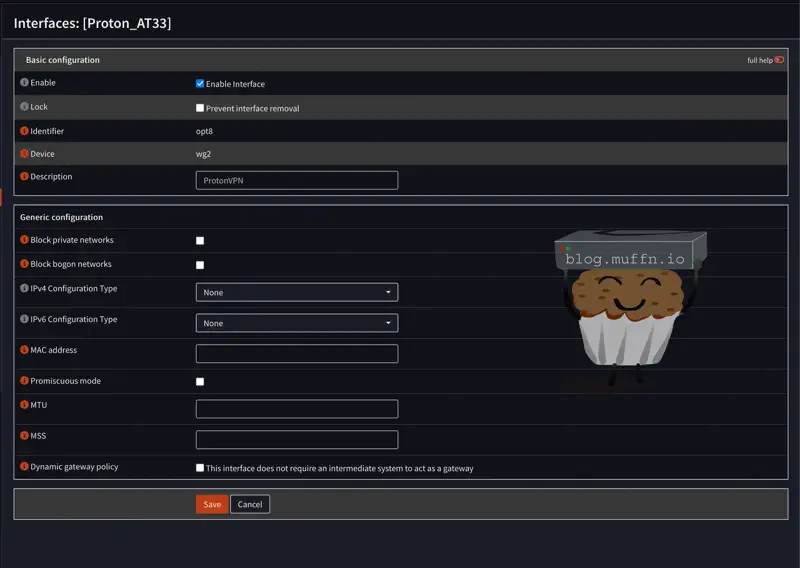
- Navigate to Interfaces > Assignments
- Under Assign a new interface select the Device dropdown and select the Wireguard instance you created in the step prior.
- Click Add to create the new interface.

- Enable: Check the box
- Description: “ProtonVPN” or similar
- IPv4 Configuration Type: Leave as
None - Save the configuration
- Apply the configuration
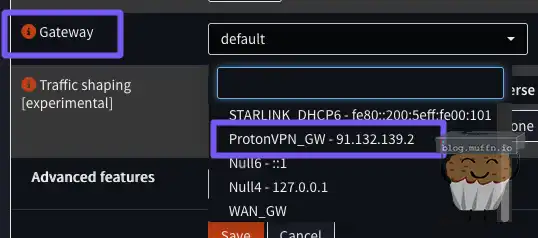
🔹 Gateway Creation #
Now we need to assign a gateway to our interface.
- Navigate to System > Gateways > Configuration
- Click Add to create a new gateway
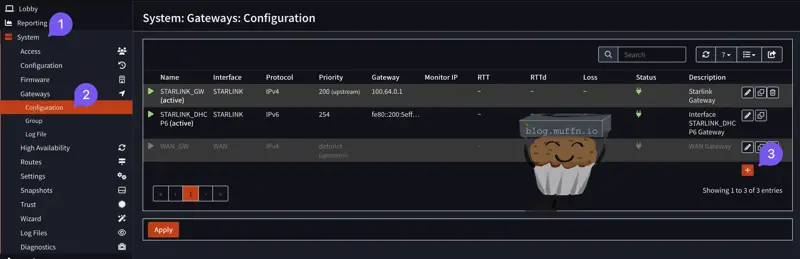
- Name: “ProtonVPN_GW”
- Interface: Select the interface you created in the step prior
- Address Family:
IPv4 - IP Address: Endpoint IP address from the configuration file
- Far Gateway: Check the box
- Save the configuration
- Apply the configuration
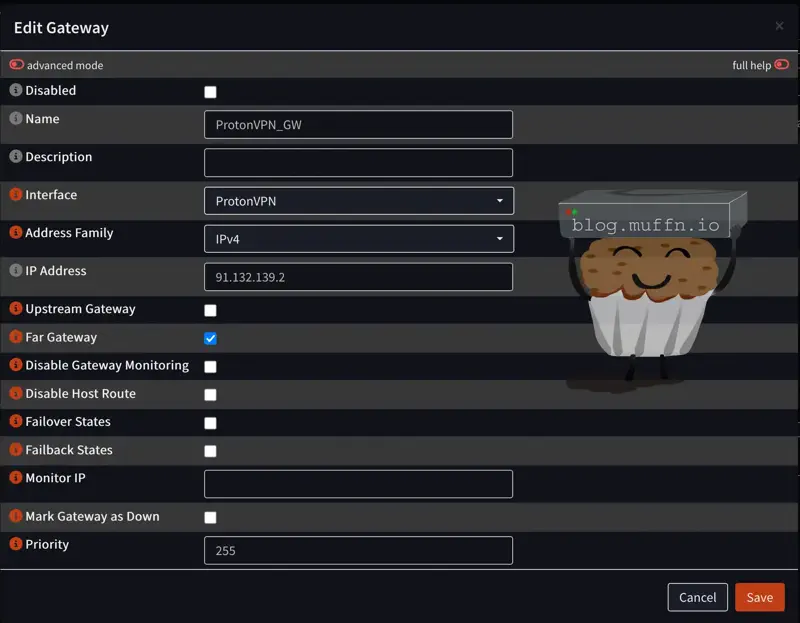
You should now see your gateway is online with a green status icon.

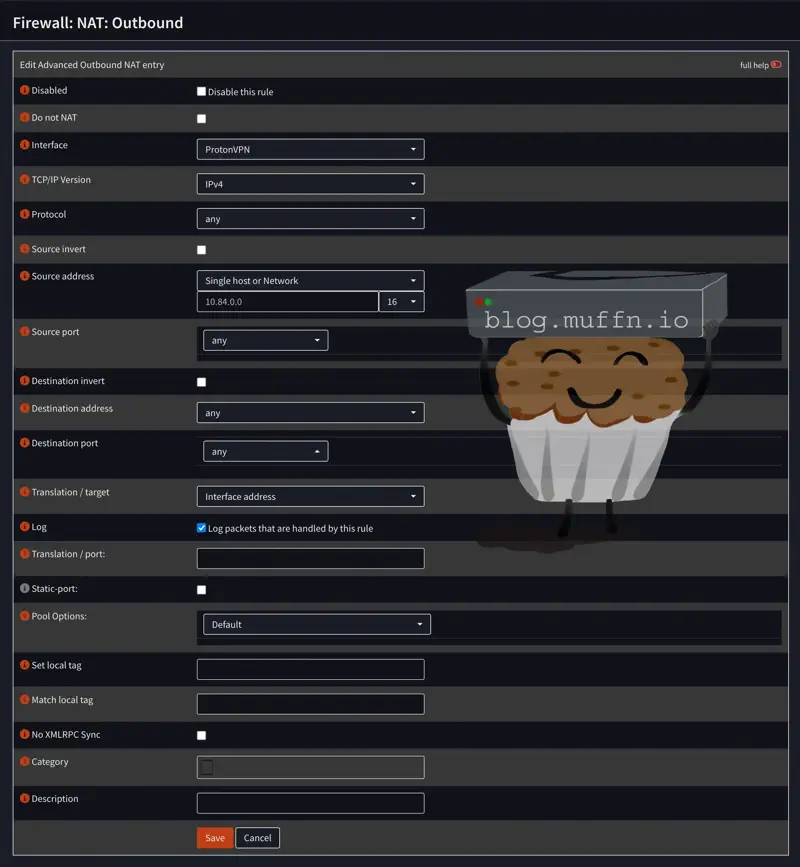
🔹 NAT Configuration #
Finally, we need to configure NAT so that we can send traffic through the VPN via our tunnel address.
- Navigate to Firewall > NAT > Outbound
- Change NAT Mode to
Hybrid outbound NAT rule generationand click Save - Click Add under Manual rules to create a new NAT rule
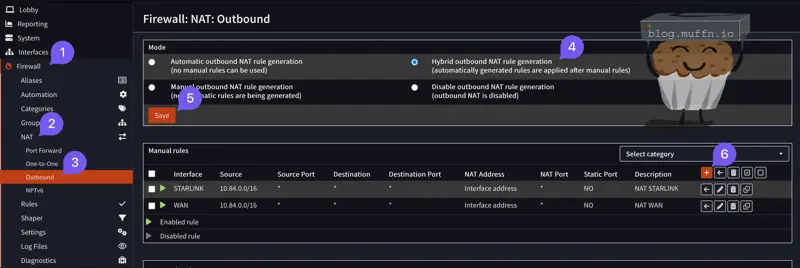
- Interface: Select the interface you created in the steps prior, in this case
ProtonVPN - Source:
Any. If you want to be more specific, you can specify the source IP address or subnet that will be allowed to use the VPN, or just assign your entire subnet. - Translation/Target: This must remain as
Interface Address - Log: Check the box
- Save the configuration
- Apply the configuration
We have now configured a secure tunnel to our VPN provider using Wireguard, given this connection an interface and gateway to route traffic via, and NAT a NAT rule to translate the traffic via our tunnel address. Everything is now in place to start routing traffic through the VPN. 🎉
🔧 Configuring Policy-Based Routing #
Now we get to the actual routing portion of the setup. PBR is essentially taking control of the routing process via firewall rules. It allows us to say “I want traffic going to this place to go out of this gateway” or “traffic from these devices must leave via this gateway”.
PBR in OPNsense works by ‘hijacking’ the normal routing process at the firewall rule level. Normally, when a packet hits your firewall, it checks the rules to see if it should be allowed or blocked. Then it consults the routing table to figure out where to send it.
With PBR, you’re saying “ignore the routing table, I want this specific traffic to go via this specific gateway regardless of what the routing table says.”
The magic happens in the firewall rules themselves. Each rule can have a gateway assigned to it. When traffic matches that rule, it gets forced down that particular path. This is why understanding firewall rule processing order is crucial. The first matching rule wins, and that includes its gateway assignment.
There are several ways to configure PBR to match traffic that you want to route via the tunnel. Sometimes this can be rather difficult due to the nature of how the internet currently works with CDNs and anycast addressing. Below are some examples of how you can configure PBR to match traffic.
It is easy to route all traffic via the VPN, but this does tend to cause issues with day-to-day browsing and a number of services. Streaming is one of these. Netflix, BBC iPlayer, and their ilk are constantly playing whack-a-mole with VPN providers, so you’ll often find yourself locked out. To make life easier, I would recommend trying to tunnel only the traffic that you need to. Allow everything else to pass through the WAN interface as normal.
If you do decide to route all traffic via the VPN, you may find you get hit with constant CAPTCHAs or outright blocked from accessing certain websites.
🔹 Methodology & Rule Processing #
The most important part of creating PBR rules is understanding how OPNsense processes them and what the ‘Gateway’ field actually does.
When a packet hits your firewall, OPNsense works through the rules from top to bottom until it finds a match. If that rule says ‘Pass’ and has a gateway specified, the packet gets shoved down that particular tunnel instead of following the normal routing table.
This is why rule order matters. If you have a specific PBR rule for Reddit traffic, but there’s a more general “allow all LAN to any” rule above it, the general rule will match first. Your PBR rule will never be evaluated.
On any rule, you will now have the option to select the created VPN gateway:
If you select this gateway on a ‘Pass’ rule, the traffic matching this rule will be routed via the VPN tunnel.
You have several ways to match traffic:
🔹 Traffic Matching Options #
- Source-based: Match traffic from specific devices/IPs
- Destination-based: Match traffic going to specific websites/services.
- Port-based: Match traffic using specific ports/protocols
- Combined criteria: Mix and match the above.
🔹 Source-Based Routing #
Source-based routing is the sledgehammer approach to PBR. All traffic from those devices gets tunneled, regardless of where it’s going. This is the easiest way to tunnel traffic from devices. Since it’s a blanket approach though, you may run into issues compared to filtering specific traffic.
One important step to do before creating a source-based rule is to create an RFC1918 alias for internal networks. To do this:
- Go to Firewall > Aliases
- Click Add
- Name: Something descriptive like “RFC1918_Networks”
- Type: “Network(s)”
- Content: Add the RFC1918 networks:
10.0.0.0/8, 172.16.0.0/12, 192.168.0.0/16 - Save and Apply the configuration

Additionally, here is when you should create a list of devices IPs you wish to tunnel inside an alias.
Now we can create a source-based rule:
- Go to Firewall > Rules > LAN (or your internal interface)
- Click Add to create a new rule
- Configure the rule:
- Action: Pass
- Interface: LAN (or whatever your internal interface is called)
- Source: Here’s where you specify what traffic to catch:
- Single device:
192.168.1.100(specific IP) - Range of devices:
192.168.1.100-192.168.1.110 - Entire subnet:
any(everything on that LAN segment) - Alias: The alias you created earlier for the devices you wish to tunnel.
- Single device:
- Destination:
RFC1918_Networks - Destination Invert: Check the box
- Gateway: Your VPN gateway (the one we created earlier)
- Critically important: Move this rule ABOVE your default allow rules using the drag handles
- Apply changes and test
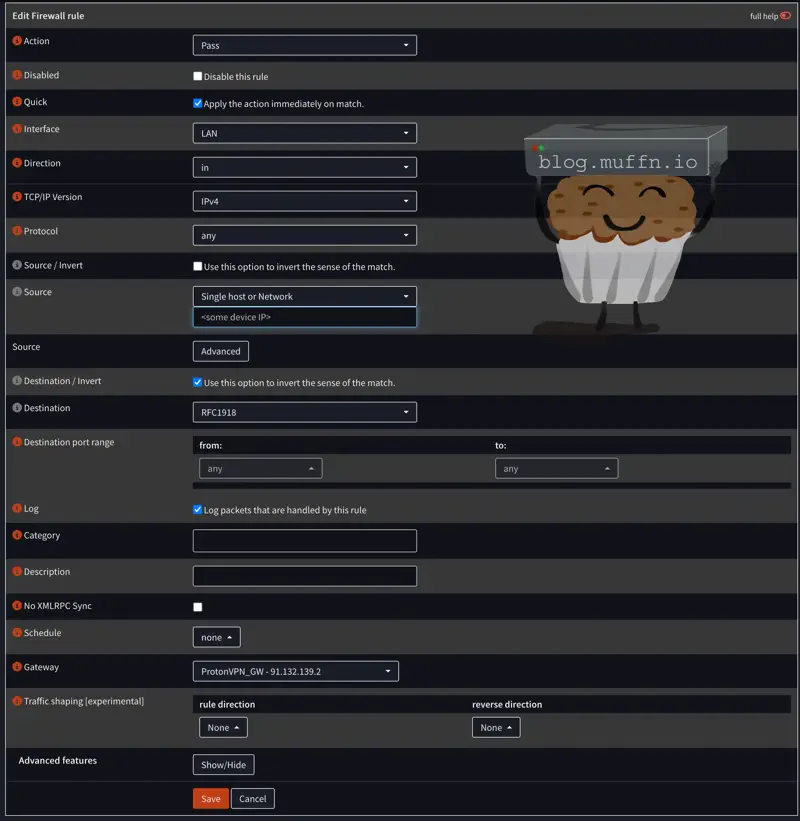
Notice what we’ve done here. By setting Destination to RFC1918_Networks and checking Destination Invert, we’re creating a rule that matches all traffic NOT going to RFC1918 addresses (192.168.x.x, 10.x.x.x, 172.16-31.x.x). This effectively captures all internet-bound traffic while excluding local network communication. This ensures that devices can still access your router, NAS, printers, etc. directly without going through the VPN tunnel.
🔹 Rule Ordering #
When applying rules, as previous, the first matching rule wins. This is why it is critical to place your PBR rules ABOVE your default allow rules.
So with the above rule, this will not work:
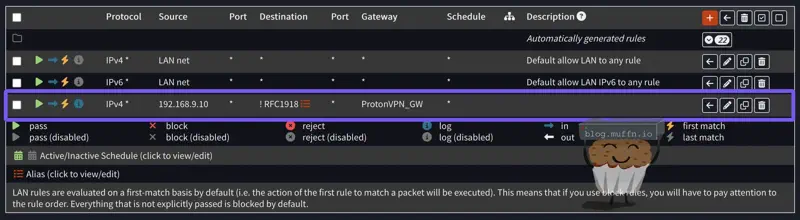
But this will work:
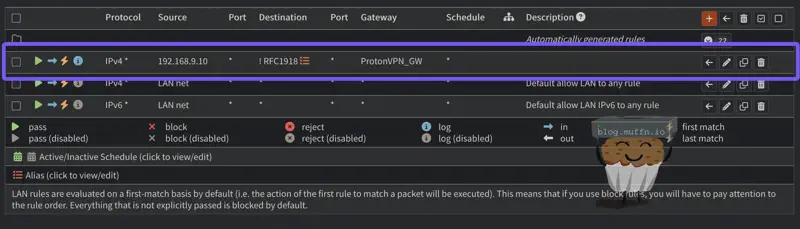
Remember this: More specific rules must be placed above more general rules. This is an important concept to understand when working with stateful firewalls.
🔹 Source-Based Routing Tips #
- Use DHCP reservations: If your device IP changes, source based PBR will break. Consider using static leases for your devices.
- Create device aliases: You can add all the devices you wish to tunnel in an alias. Going forward, all you need to do is add/remove devices from the alias and your rules will update automatically.
🔹 Destination-Based Routing #
Destination-based routing is the most flexible approach to PBR. It allows you to target specific websites or services. Even specific ports/protocols.
To simply route all traffic to a specific site via the VPN, you can create a simple alias and point it to the site you wish to tunnel. In the below example I will be using the site wtfismyip.com which we will use to test our PBR rules.
You must add URLs as aliases to be used in firewall rules. You cannot use URLs directly in the destination field.
-
Create an alias for your target sites:
- Go to Firewall > Aliases
- Click Add and create new alias type “Host(s)”
- Name: Something descriptive like “Tunneled_Sites”
- Type: “Host(s)”
- Content: Add domains (
wtfismyip.com) - Save and Apply the configuration
-
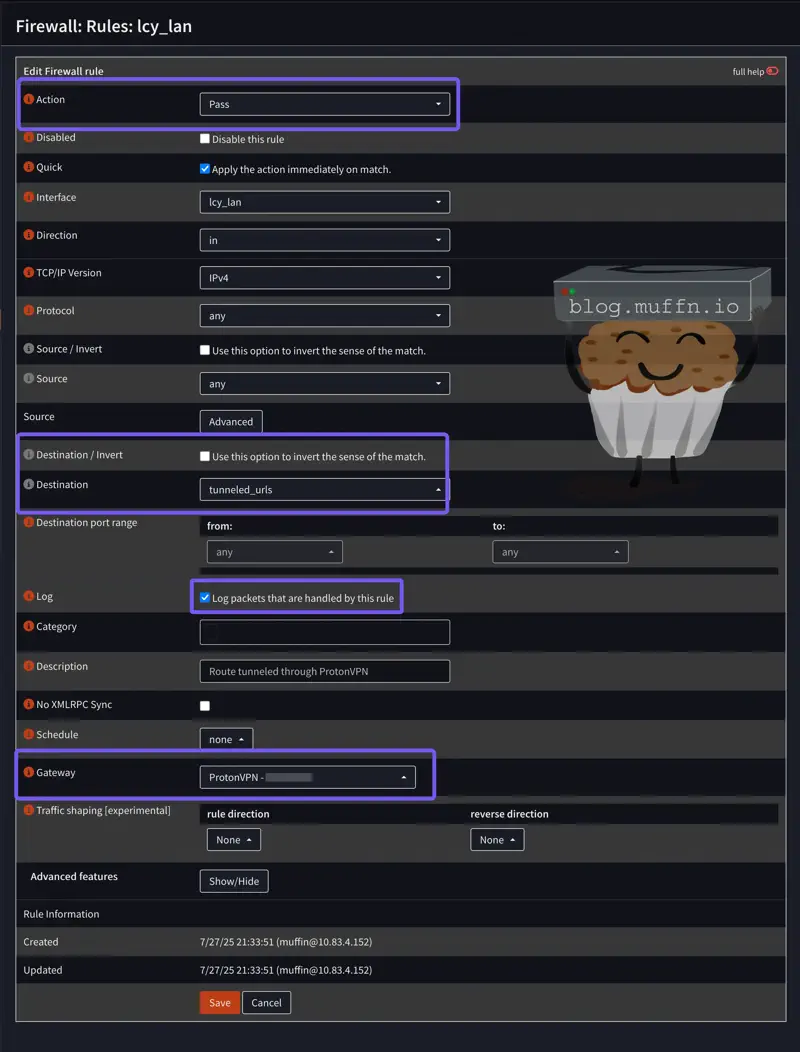
Create firewall rule:
- Action: Pass
- Source: Any (or limit to specific devices if needed, as above)
- Destination: Your newly created alias
- Gateway: VPN gateway
- Log: Check the box
- Save and Apply the configuration
Now, ensuring the rule is placed above your default allow rules, you should be able to browse to wtfismyip.com and see what IP address you are coming from. Which should be your VPN.
Tip: wtfismyip.com allows easy terminal use to test this, as follows:
❯ curl wtfismyip.com/json
{
  "YourFuckingIPAddress": "91.132.139.3",
  "YourFuckingLocation": "Langenzersdorf, 3, Austria",
  "YourFuckingHostname": "91.132.139.3",
  "YourFuckingISP": "M247 Europe SRL",
  "YourFuckingTorExit": false,
  "YourFuckingCity": "Langenzersdorf",
  "YourFuckingCountry": "Austria",
  "YourFuckingCountryCode": "AT"
}
We can clearly see this has worked, as I am not in Austria (although Austria is a great country, highly recommend a visit). Now, if you wanted to add more sites, you would simply add them to the alias Tunneled_Sites.
URL Table Aliases are a more advanced feature that allows you to point to external URLs that contain lists of IPs/domains. This will be covered in the next section.
🔹 Port-Based Routing #
Port based routing is different. Instead of caring about the source (who) or destination (where), it focuses entirely on the type of traffic based on ports and protocols.
This approach is useful when you want to route specific types of traffic regardless of source or destination. Think of it as “route all HTTP traffic through the VPN” rather than “route traffic to a specific site through the VPN”. Routing traffic this way is less common, but can be useful in some scenarios.
The following rule routes all HTTP (port 80) and HTTPS (port 443) traffic through the tunnel, essentially making all web browsing go via VPN.
- Create firewall rule:
- Action: Pass
- Source: Any (or specific devices/networks, as above)
- Destination: Any
- Destination Port:
80,443 - Gateway: VPN gateway
Let’s say you want to route BitTorrent traffic through the VPN for privacy:
-
Create port alias for BitTorrent:
- Go to Firewall > Aliases
- Name: “BitTorrent_Ports”
- Type: “Port(s)”
- Content:
6881-6889,6969,8080(common BitTorrent ports)
-
Create firewall rule:
- Source: Any (or specific devices if you only want some users affected)
- Destination: Any
- Destination Port: BitTorrent_Ports alias
- Gateway: VPN gateway
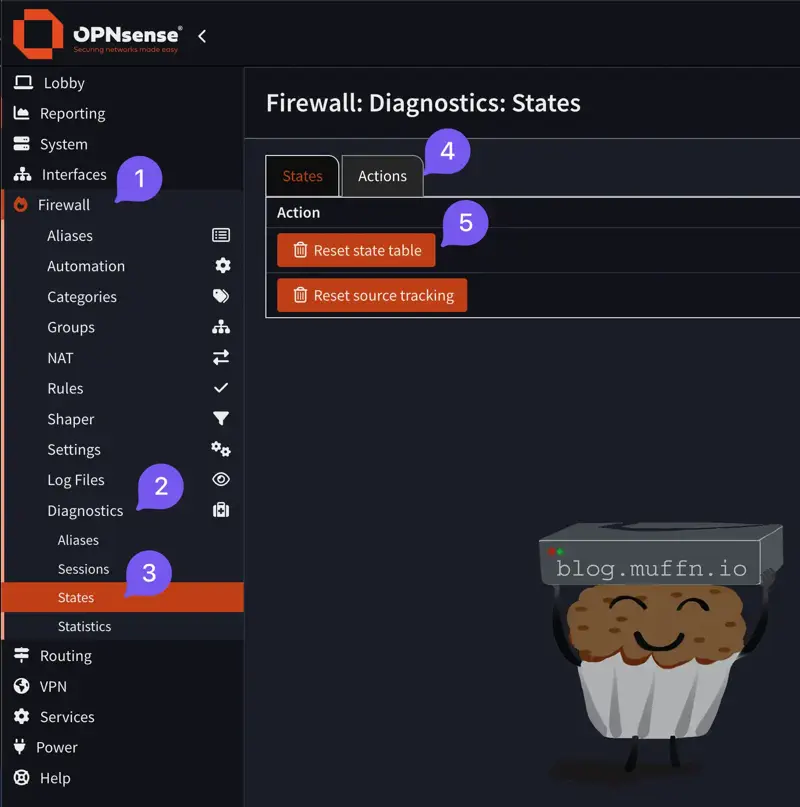
🔹 State Table #
The state table is OPNsense’s memory of active connections. When you create a new PBR rule, existing connections will continue using their old gateway until their state expires or you manually clear it.
This is why when you add a PBR rule for a website, it may appear to not be working. In fact, the firewall just has an active state for the website using the old gateway.
There are several ways to clear the state table:
Nuclear option: Go to Firewall > Diagnostics > States and click Reset states. This kills every connection on your network, including your access to the firewall. It may appear like the firewall is down, but just wait a few seconds and refresh the page.
Targeted approach: Use the filters on the same page:
- Filter by Source (device IP) to clear states from specific devices
- Filter by Destination to clear states going to specific sites
- Select and delete the relevant states
Command line (if you’re into that):
pfctl -k 192.168.1.100    # Kill states from specific IP
pfctl -K reddit.com       # Kill states to specific destination
🔹 Troubleshooting #
🔸 It’s not working! #
The most common issue is DNS resolution. When you add reddit.com to an alias, OPNsense needs to resolve that to IP addresses. If DNS resolution fails, the alias will be empty. Your rule won’t match any traffic.
Check your alias statistics:
- Go to Firewall > Aliases
- Look at the “Loaded” column, if it shows 0, your domains aren’t resolving
- Check the logs for any errors with aliases, under Firewall > Log files > General
🔸 It worked yesterday but not today! #
Most likely CDNs and load balancing are the culprit. Many services use hundreds or thousands of IP addresses that change regularly. Reddit, for example, uses Fastly CDN which serves content from different IPs depending on your location and load.
Solutions:
- Use URL table aliases that are regularly updated
- Include CDN provider IP ranges (this can be overly broad however)
- Monitor your aliases and update them when services change infrastructure
🔸 Some parts of the site work but others don’t #
Modern websites load content from multiple domains. Reddit might load the main page from reddit.com, images from i.redd.it, videos from v.redd.it, and ads from various other domains. You need to catch all the relevant domains.
Tools to help:
- Browser developer tools (Network tab shows all requests)
- Wireshark packet captures to see what domains are actually being accessed
- Community-maintained lists (like my Reddit Gist below)
🔸 I’ve just added a new site to my alias and it’s not working #
You probably need to clear your states table.
🔹 Kill Switch #
Whilst not necessarily needed in the examples I have provided, it is sometimes useful to have a kill switch in place. This is a rule that will block all traffic if the VPN connection is lost. If you need to make sure traffic does not leak from your normal WAN connection, like for BitTorrent traffic.
A kill switch works by creating a block rule that only applies when your VPN gateway is down. When the VPN is up, your PBR rules route the traffic through the tunnel. When the VPN goes down, the kill switch blocks the traffic entirely. Rather than letting it fall back to your WAN connection.
Example: BitTorrent Kill Switch
Let’s set up a kill switch for BitTorrent traffic so it can never leak through your regular internet connection:
-
Create your normal PBR rule (as shown in the torrenting example above):
- Action: Pass
- Source: Any
- Destination: Any
- Destination Port: Torrent_Ports alias
- Gateway: VPN gateway
-
Create the kill switch rule below it:
- Action: Block
- Source: Any
- Destination: Any
- Destination Port: Torrent_Ports alias
- Gateway: Default (no gateway selected)
The logic is simple. When the VPN is up, the first rule matches and routes BitTorrent through the tunnel. When the VPN is down, the first rule doesn’t match (no gateway available). So the second rule matches and blocks all BitTorrent traffic.
For device-based kill switches, replace the destination port with your device alias:
- Block rule: Source = Tunneled_Devices alias, Destination = Any
This ensures devices that should only use VPN get completely blocked if the VPN fails. Rather than falling back to direct internet access.
🔒 DNS Leak Prevention #
Your DNS queries can still leak through your ISP even when your web traffic is going through the VPN. This can severly impact your privacy and security.
When you visit canhas.cheezburger.com, your browser first needs to resolve that domain to an IP address via DNS. If those DNS queries are still going through your ISP’s DNS servers, they can see exactly which sites you’re visiting, even if the actual traffic is tunneled. This is less of an issue for cencorship and more of a privacy concern.
🔹 Understanding DNS Leaks #
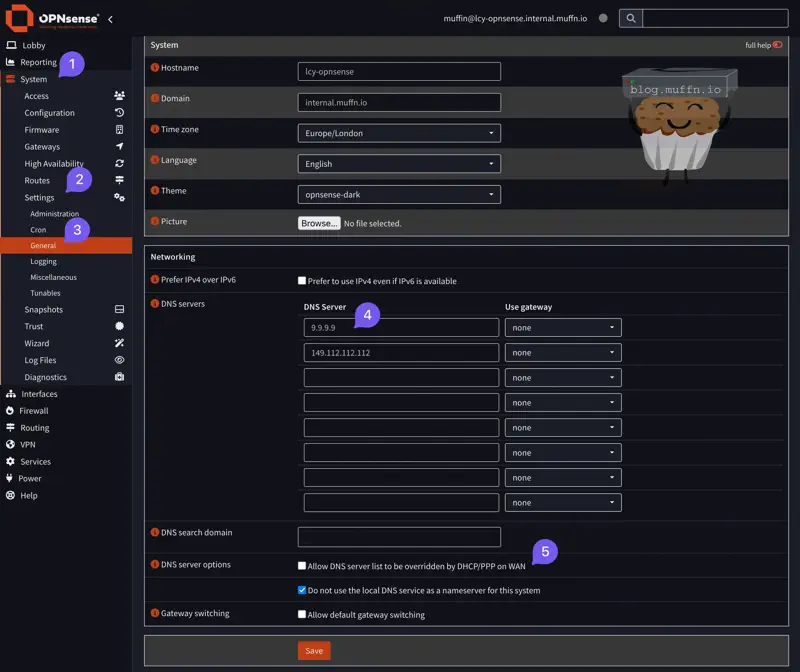
By default, OPNsense will use whatever DNS servers you’ve configured in System > Settings > General. These are typically:
- Your ISP’s DNS servers (automatically provided via DHCP)
- Public DNS servers like 1.1.1.1 or 8.8.8.8
Even with tunneling your web traffic through a VPN, DNS queries might still use your regular WAN connection. This means your ISP can still see:
- Which domains you’re resolving
- When you’re accessing certain services
- Your browsing patterns and habits
🔹 OPNsense DNS Configuration #
If you want a network-wide solution without the complexity of Unbound configuration, you can simply change your OPNsense DNS servers. This is much simpler than the advanced Unbound approach above.
- Navigate to System > Settings > General
- IMPORTANT: Uncheck “Allow DNS server list to be overridden by DHCP/PPP on WAN” - Otherwise your ISP will override your secure DNS settings
- Replace DNS servers with secure options:
- Primary:
9.9.9.9(Quad9 - This is what I use and recommend) - Secondary:
149.112.112.112(Quad9 Secondary) - Optionally:
94.140.14.14and94.140.15.15(Proton’s public DNS) - Optionally:
1.1.1.1and1.0.0.1(Cloudflare)
- Primary:
- Optional - Route DNS through VPN: For each DNS server, you can select a gateway from the dropdown:
- Leave as “Default” to use your regular internet connection (Quad9/Cloudflare are secure by default)
- Select your VPN gateway to route DNS queries through the tunnel for maximum privacy
This assumes you are using your OPNsense machine as your DNS server, for most reading this I will assume this is the case, if not then you will know what to do in your setup.
🔹 Client-Side DNS Configuration #
If configuring DNS routing on the firewall seems complex, you can simply configure secure DNS directly on your devices. This is often easier and just as effective for DNS leak prevention.
On Windows:
- Go to Settings > Network & Internet > Status
- Click Properties for your network connection
- Under DNS server assignment, click Edit
- Select Manual and configure:
- IPv4:
9.9.9.9and149.112.112.112(Quad9) - Or:
1.1.1.1and1.0.0.1(Cloudflare)
- IPv4:
On macOS:
- System Preferences > Network
- Select your connection and click Advanced
- Go to DNS tab and add:
9.9.9.9and149.112.112.112(Quad9)- Or:
1.1.1.1and1.0.0.1(Cloudflare)
On iOS/Android: Most mobile devices now support DNS over HTTPS in their network settings. Look for “Private DNS” or “Secure DNS” options.
Browser-Level DNS: Modern browsers support DNS over HTTPS which encrypts DNS queries:
- Firefox: Go to
about:config, setnetwork.trr.modeto2, andnetwork.trr.uritohttps://dns.quad9.net/dns-query - Chrome: Settings > Privacy and security > Security > Use secure DNS, then select “Quad9” or “Cloudflare”
🔹 Advanced DNS Configuration #
If you are so inclined, you can configure Unbound on your OPNsense machine to become your own root DNS server, this is a more advanced topic and I will not be covering it in this guide, but knock yourself out if you’re interested.
🔹 Testing for DNS Leaks #
Once configured, test your setup to ensure DNS queries aren’t leaking with a service such as dnsleaktest.com.
If you see your ISP’s DNS servers or your real location in the results, you still have DNS leaks to fix.
Reddit Tunneling #
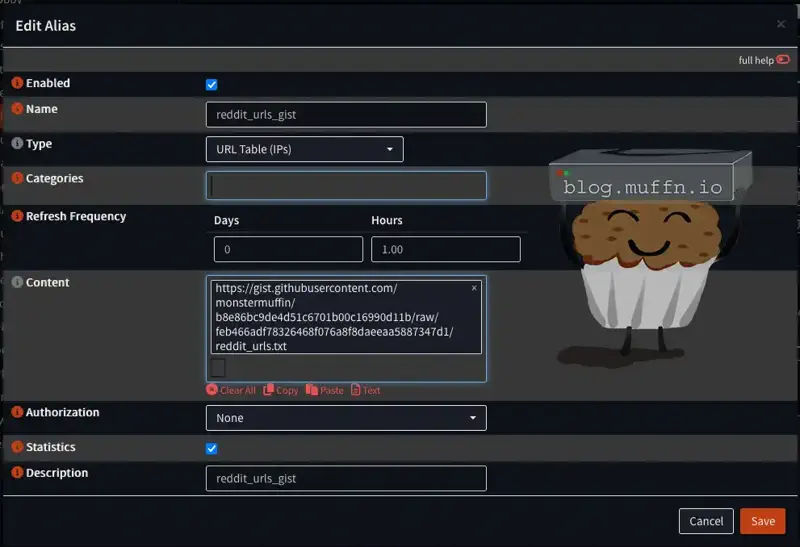
I created a GitHub Gist that includes a number of URLs I collated that are used by Reddit. When these are tunneled, I no longer receive any age verification prompts. This works across all devices, be it in browser or in the app.
- Navigate to Firewall > Aliases
- Click Add to create a new alias
- Configure the alias as follows:
- Enabled: Check the box
- Name: “Reddit_URLs_gist”
- Type: “URL Table (IPs)”
- Refresh Frequency:
Hours: 1 - Content:
https://gist.githubusercontent.com/monstermuffin/b8e86bc9de4d51c6701b00c16990d11b/raw/feb466adf78326468f076a8f8daeeaa5887347d1/reddit_urls.txt - Statistics: Check the box
- Save the alias
OPNsense should resolve these domains when you save and apply. You can see this in the logs, as shown below:
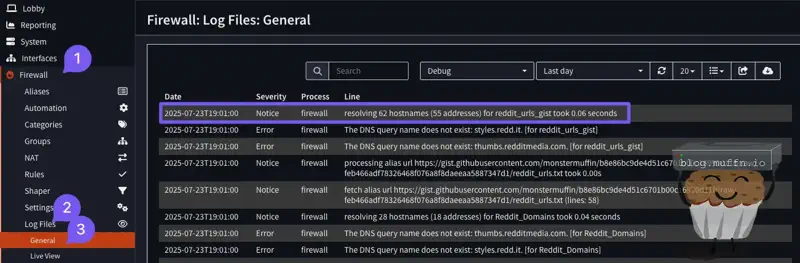
You may get some errors as I have. This is because some of the URLs I added are not valid, but this is not a problem.
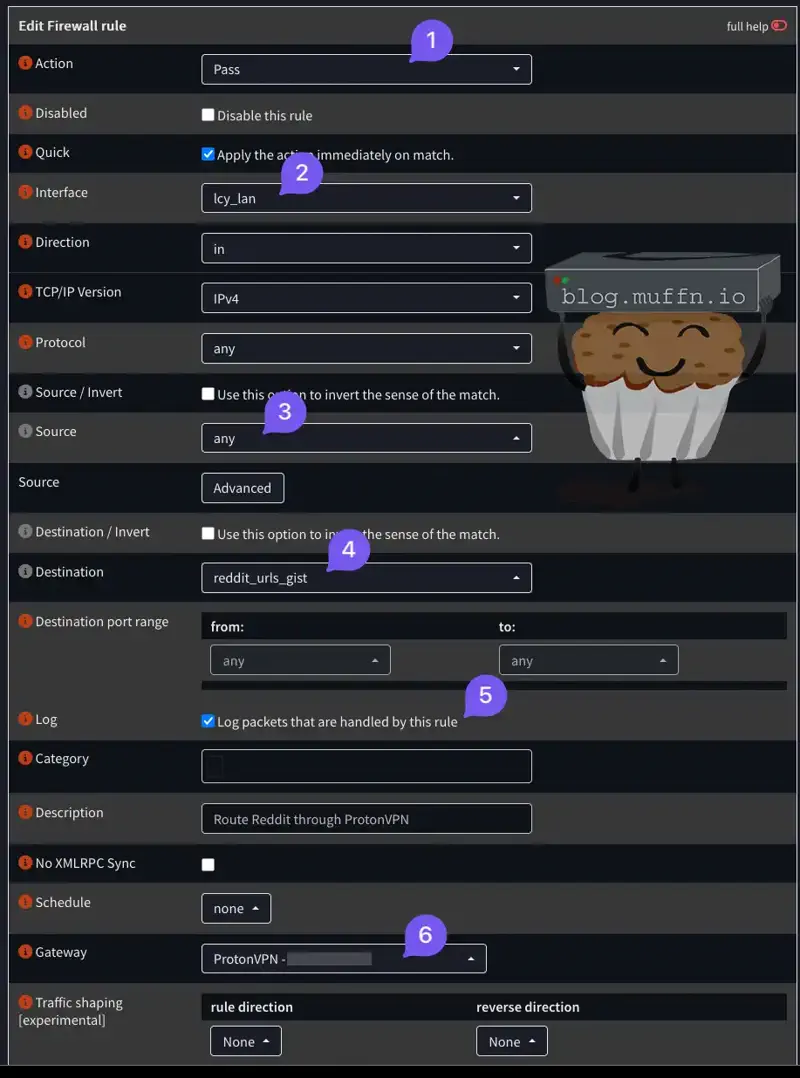
- Create a new firewall rule:
- Source: Any
- Destination:
Reddit_URLs_gist - Log: Check the box
- Gateway: VPN gateway
Another way to do this is to create an alias with all the Fastly IPs, but this will tunnel a lot more traffic than necessary. Though it would be the next best option if the above stops working for some reason. Fastly lists their public IPs as JSON here.
🧪 Testing & Verification #
Once you’ve configured your PBR rules, it’s crucial to verify they’re actually working. Here’s how to properly test your setup:
🔹 Firewall Log Verification #
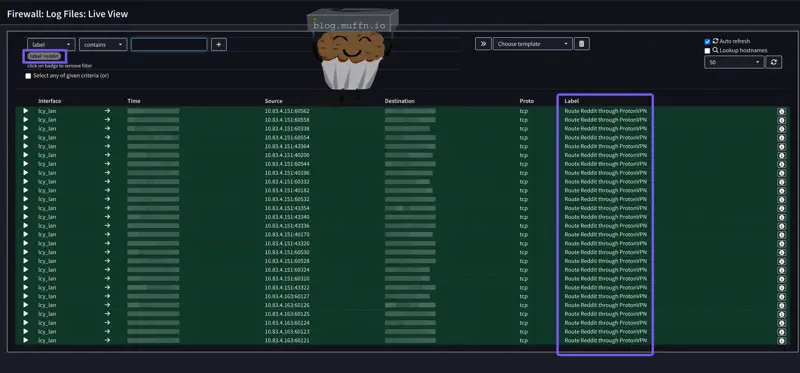
The best way to confirm your PBR rules are working is to watch the firewall logs in real-time as you browse. This shows you exactly which rules are being matched and which gateway the traffic is using.
- Navigate to Firewall > Log Files > Live View
- Configure the log filter:
- Source: Enter the IP address of the device you’re testing from
- Click Apply Filter
- Generate Traffic: From your test device, browse to a site that should be tunneled (e.g., reddit.com)
- Verify in logs: You should see entries showing:
- Your source IP
- The destination (reddit.com IPs)
- Most importantly: The rule description
You should see something like the below:
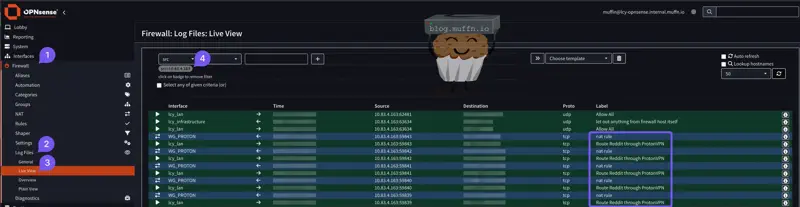
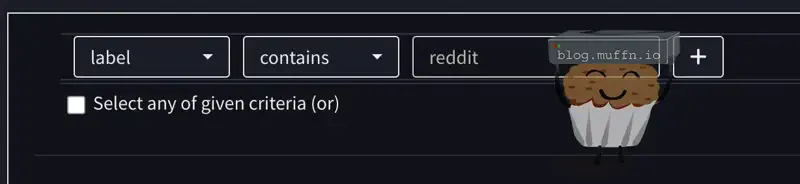
You can also filter by rule, select the ‘Label’ filter and you can enter a partial, as below:
🔹 IP Address Verification #
As before, add some of the below URLs to your ‘Tunneled_Sites’ alias, and test your external IP from these services.
Quick browser tests:
Command line verification:
curl ipinfo.io
curl ifconfig.me
curl icanhazip.com
curl wtfismyip.com/text
What to verify:
- IP address matches your VPN server location
- Country/region shows VPN location, not your real location
- ISP shows your VPN provider, not your actual ISP
🔹 DNS Leak Testing #
As previous, check your DNS setup and ensure you aren’t leaking DNS queries.
⚠️ Common Issues & Quick Fixes #
Here’s a quick reference for the most common PBR problems and their solutions:
| Problem | Quick Fix |
|---|---|
| Traffic not tunneling | Check rule order (PBR rules must be ABOVE general allow rules) |
| Just added a site, not working | Clear state table: Firewall > Diagnostics > States > Reset states |
| Internet completely broken | Check DNS configuration in System > Settings > General |
| Can’t access local devices | Verify RFC1918 alias and “Destination Invert” is checked |
| Alias shows 0 entries | Check Firewall > Aliases “Loaded” column - DNS resolution failed |
| Worked yesterday, not today | Service IPs changed - check/update aliases, consider URL table aliases |
| Some parts of site work, others don’t | Missing domains - use browser dev tools Network tab to find all requests |
| VPN drops, traffic still flows | Kill switch not configured - add block rule below your PBR rule |
| Constant CAPTCHAs | You’re tunneling too much traffic - be more selective |
General debugging steps:
- Check firewall logs first (Firewall > Log Files > Live View)
- Verify your rule is being matched (look for rule description in logs)
- Clear state table after any rule changes
- Test with simple sites like
wtfismyip.combefore complex services
🏁 Fin #
Hopefully this guide has helped you understand and/or implement PBR yourself. As usual, thank you for reading, if you have anything to ask or add, please feel free to do so below, cheers!
muffn_ 🫶

Sony A7R III + Sigma 24-70mm f/2.8 DN DG ART @ 24mm, f/2.8, 1/1500s, ISO 500